How to Fix Caulk and Chinking Blisters Without Stress or Callbacks
Blisters in Your Caulk or Chinking? Here’s How to Fix It Without Losing Your Cool or Customer!
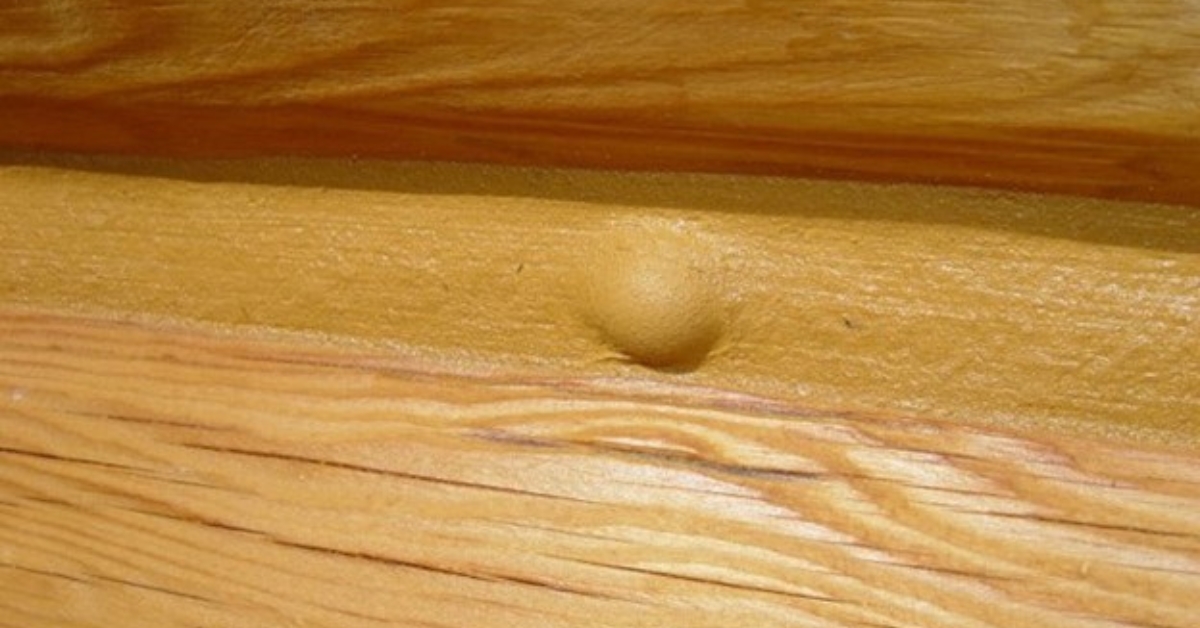
You laid down your bead, smoothed it out, stepped back to admire it, and bam, there it is. A blasted blister. That dang little bubble that shows up right when you’re trying to wrap up (end of the day, over budget, thumb still throbbing from that ladder incident. Classic. We’ve all been there). First things first, it’s not the end of the world. It happens every now and again, and it’s easy to fix.
Let’s walk through why it happens, what to do about it, and how to avoid it next time.
So, Why the Blister?
Blisters in caulking and chinking usually show up when moisture vapor trapped underneath tries to escape, but the surface has already skinned over. That trapped moisture pushes up, and boom, a bubble.
It’s more likely to happen when:
- Caulk or chinking was applied in direct sun.
- The surface was too hot (Sashco recommends temps be between 40°F and 90°F. If the surface is hot to the touch, it’s too hot for applying sealants.)
- The weather was hot (See above, rarely is the weather hot and the surface not.)
- The surface was still damp when you started.
Caulk dries from the outside in. If the surface skins over too fast (like when you’re working in the sun or on a hot, damp surface), that moisture gets trapped and pushes up. That’s your blister. It’s not a mess-up, just moisture trapped where it shouldn’t be.

Caulking or chinking dries from the outside in. If the surface stings over too fast, moisture gets trapped and pushes up.
Can You Prevent It? Yeah, Most of the Time.
If you’ve got some flexibility in the job timing, shoot for:
- Cooler times of day (early morning or evening).
- Shaded areas instead of direct sun.
- Dry surfaces (actually dry, not “it rained six hours ago” dry).
Still, sometimes the conditions just aren’t ideal. That’s life. The good news is that fixing a blister is simple.
How to Fix a Blister in Caulking or Chinking
You’ve got two scenarios: the caulk is dry, or it’s still curing. Here’s what to do for both.
If the Caulk Is Cured:
- Cut the blister out with a utility knife. Get rid of the damaged section.
- Fill the spot with fresh caulk or chinking. Use the same type you used before.
- Tool it smooth so it blends in. If it looks off or isn’t quite flush with the rest of the surface, let it skin over for a day and hit it again with another skim coat.
That’s it. Nothing fancy.
If the Caulk’s Still Wet:
- Pop the blister with your knife or a pin, just enough to release the pressure.
- Push it down so it settles back in.
- Add a little more caulk over top and tool it smooth.
Easy fix. Looks clean, works like it should.
The Pep Talk
Blisters happen. No big deal. Now you know how to fix them without fuss. If you want more solid tips or straightforward info for the jobsite, check out the Place for Pros on our website. It’s definitely worth a look and packed full of practical stuff that’s actually useful out there.
Share this:
About Sashco Log Home Products
When it comes to protecting and beautifying your log home, Sashco isn’t just another stain on the market — it’s the high-performance choice for serious log lovers. With industry-leading products like Capture, Cascade, and Transformation, Sashco combines cutting-edge technology and rugged durability to keep your logs looking stunning and standing strong year after year. Whether you’re chasing that perfect finish or just want to avoid the heartbreak of costly repairs, Sashco’s got your back. Because your log home deserves more than “good enough,” it deserves Sashco. Made for logs. Made to last. Made to make your neighbors jealous.


 | Sashco")


 | Sashco")

